Web redirect

New work, news and Images from the shop. If you would like to know more about my art, please visit my full website @ www.chrisbathgate.com

11/5/19


Ampoule, CNC, Fine art

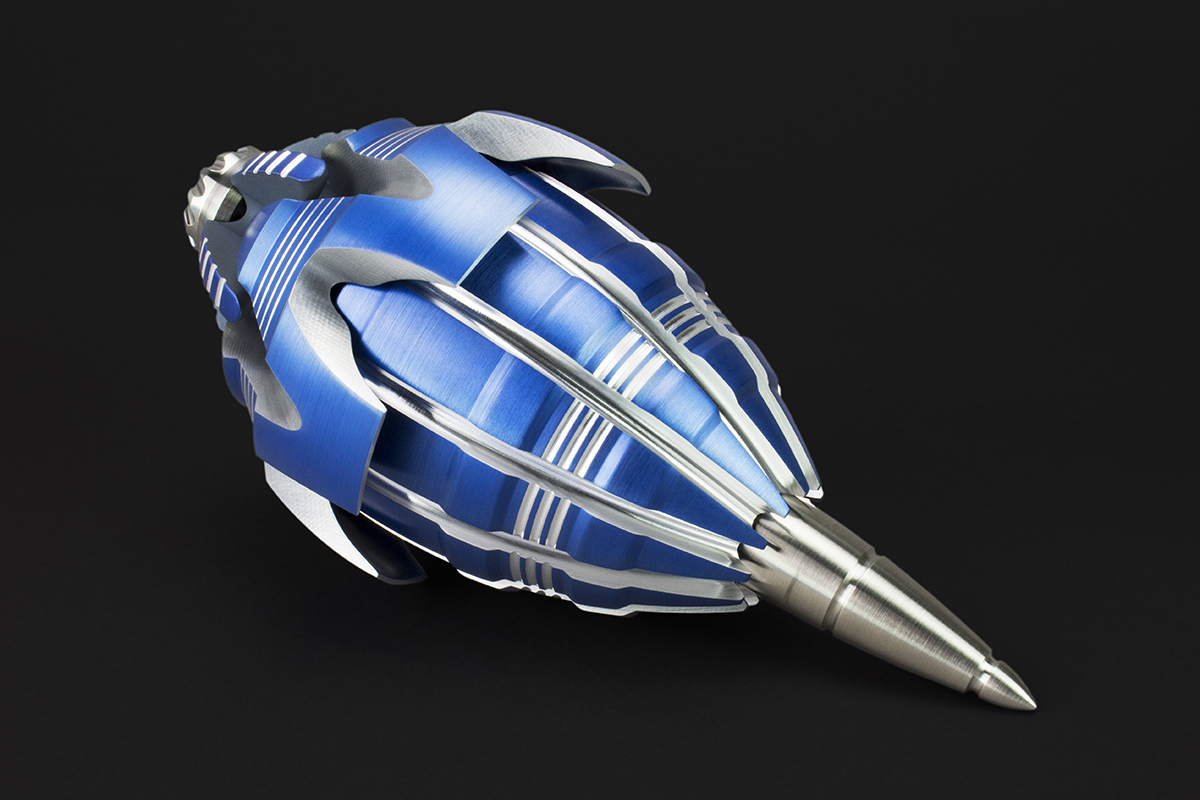
Machined Metal Ampoule, or the AMP for short.

Introducing the fourth installment of a growing series of mechanical vessel sculptures. As I continue to explore various aspects of modern machine work as a fine art craft, I have found that one line of inquiry in particular continues to occupy a disproportionate share of my attention. 

More specifically, I am talking about my projects that involve examining the traditional craft forms of other industrial mediums (wood turning, knife making, glass work, ceramics etc) through the lens of my own craft (machining). It is quickly becoming an obsession of mine and has helped me better understand the ways in which my process is becoming more widely adopted as a sculptural medium. It has proven personally fruitful for me as a sculptor as well. 


Following on the heels of the SMV3, which was one of the larger and more complex editions I have made to date, I was craving something a bit simpler and minimal to approach next. An ampoule seemed to fit the bill perfectly. 

While the term "ampoule" has a more formal definition and is commonly understood as a small, sealed glass cylinder or medical implement, anyone who has dabble in any sort of fictional or fantasy nomenclature (or even the world of perfume) knows the word “ampoule” has been used more liberally with a much wider range of variation of forms and contexts.

machined metal Ampoule

With this project, I went with a bit broader interpretation when deciding what an object like this might be. The result is a sculptural object that is, from a mechanical perspective, a bit less flashy than some of my other vessels. But just like the others, it excels at being a striking aesthetic object. 

It was also an opportunity to combine some of my previous research on Chinese snuff bottles with some of the defining elements of what an ampoule might be. There is a surprising amount of overlap between the two objects. 


As I mentioned already, the mechanical functionality of this work is rather simple when compared to its predecessors, but it is no less interesting from a design perspective. 

I wanted this vessel to be truly air and water tight, and while achieving that is not really all that difficult, making something that seals well and is also pleasing to look at while having interesting functionality often is. 

Balancing all of those things in this work, as well as previous ones, has taught me so much more about making formal sculpture than I ever anticipated, which is why I continue to pursue these projects. My appreciation for the overlapping spheres of craft, design, and art continues to grow with each new edition.

CNC machined Ampoule

On the technical side, the lid and container parts have a geometry that neatly fits each other much like a keyed shaft. The turned features, before being milled, are sized such that the two halves would never fit together. It is only by selective removing material from the lid, and creating slots in the vessel, that they are able to slide together, seating a spring loaded plunger, that floats inside of the lid, onto a tapered opening in the lower vessel.

Once the plunger seats, the lid can be rotated into a position where it can use the spring tension to lift back up and hook into a series of notches in the vessel.


The work is a little large for an ampoule (3.75"x1.5"D) but I wanted it to be a scale that fits well in the hand, as well as have some useful space inside. It can still easily be pocketed if you are brave enough to do so. 


Some of you will rightly look at this design and point out that it does not stand on its own. Something that might be problematic if you actually wanted to use it for some purpose. You wouldn’t be wrong.

One of the things that appealed to me about many glass ampoules, is that they are sealed single use type objects, and so they don’t really need to stand. They are often just dispensed from a box or holder of some sort. As a sculptor who often struggles with that pesky interface between the real world, gravity, and my creative ideas, I felt this was a great excuse to make an object that while utilitarian, was free of the constraint of needing to stand on its own. 

It is an allusion to the object that inspired it, but it also helps reinforce that it is an object meant to be appreciated for its aesthetics ahead of its functionality. 


That being said, while I have never really liked making overt stands for my work, and I try where I can to make work that does not require them, in the end, I did have to make a small concession. I realized people might want (or need) this piece to stand in certain contexts, in order to put it to some real use. So I made a no frills accessory stand out of Delrin for the Ampoule to rest in. 

The stand is purely functional, and I don’t really consider it part of the actual work, but for practical reasons, I knew I needed to include it. So while it won't appear in any of the official photos, I plan to provide these to all of you who want to add one to your collection. 

I would also encourage anyone who is game to design, turn, or 3D print something of their own. I think their is a lot of room to get very elaborate with something like that, however, I wanted to remain focused on the actual object for the time being. 

CNC Fineart, Ampoule

Which brings me to the portion of this post reserved for the collectors among you. 

Like all of the objects in this series, an edition is certainly going to be on offer very shortly. 

The AMP will be a bit more affordable than the last few projects. So while it is a nice contrast to previous vessel pieces, hopefully it also opens the door a little wider to some of you collectors who have found yourselves priced out as of late. Affordability is a relative term, but those of you have been following along probably know what to expect from a piece like this. 

I have a bit more work to do to finalize the pricing, but details for a sign up and a link will be posted at the end of the week. (lets say November 8th) 

So look for a second update very soon. 

As always, comments and questions are welcome. 

10/16/19

Final thoughts on the SMV3 Project.


Bringing the SMV3 project to a close.

The SMV3 project is now complete, so it is time to take stock and reflect a little. The best way to do that in my opinion, is to allow a little time to tinker a bit at the end. Like all of my edition projects, it just wouldn't be right to bring such an interesting sculptural concept to a close without having a bit of fun with color using some of the spare parts from production.


There are always a few spare parts, but in this case, the production run for the SMV3 went so smoothly, and I scrapped so very few parts, I had more than plenty on hand to experiment with and I ended up with an additional "four" one of a kind works.


I had always planned to do one or two of these, so I strategically worked in a few aluminum parts so I could experiment with anodizing when the time came to make this little encore. 


My only regret is that I wish I had opportunity to expand on this a little further, but I know it is time to move on. I need to get to one of the many other ideas I have waiting for me, as they all deserve their day in the sun. 

So what you see, is all that will ever be. Any further concepts will just have to carry over and find expression somewhere else, which is never a bad thing.


So, if you missed out on the original limited release, or just want to add another jewel to your collection, I will be putting these up for collection so they can go to good homes. 

To that end, I have opened an unannounced sign up sale sheet at the link below.


I will leave it open until the beginning of next week (list will close at 9AM Oct 21) Terms of the sale and price are on the sheet. 


Thanks again to everyone who followed along and contributed thoughts and comments along the way. I appreciate hearing from you all. 

We will see you on the next project. And as always, thoughts and comments are welcome. 


9/10/19

New book Release


New Art Book! New Art Book! New Art Book! 


As part of my upcoming exhibition at the National Museum of Industrial History (opening this January) I have been preparing a comprehensive re-issue of my Artist book. It has been nearly three years since it was last updated, so there was gobs of new work to include.


This new soft cover edition is a whopping 264 pages of machined art goodness. It includes a comprehensive chapter dedicated to all of my kinetic and pocket art projects to date. This new section has been handled with extra care, with plenty of exposition to ensure that each kinetic art project retains the necessary context to be appreciated as a bridge between the worlds of fine art, craft, and design.


Unlike previous releases of my book, which were issued through Blurb. This time I am finally (finally!) getting this done the right way. I have partnered with a very enthusiastic local printer to make sure that the print quality is exactly what I want and far superior to anything that has come before it. And because I am getting a sizable print run, the price will be far more affordable than previous printings (just $25 each). 


While there will of course be copies on hand at my show this coming January, if any of you want to get your hands on a advanced copy now, I am starting a sign up for early release now. 


I will be signing and numbering each of these advanced copies just to make them a bit more special than what the general release will be.


This book has been an ongoing project of mine, and I appreciate all of you for following what I do, it has meant everything to my work and to me, so thank you. 

And as always, comments and questions are welcome. 


6/25/19

SMV3 (Snatch Vessel)


Over the last three years, I have been exploring the ways in which my medium (machine work) intersects with various design and craft traditions.

This work is the third in my series of mechanical vessels, all of which stem from a collection of sketches I made back in 2016. At that time, I began thinking more seriously about how utility plays a key role in various aesthetics within the industrial arts.

Since then a have become involved in a full blown inquiry of how various industrial processes find their way into artistic use, and it has blossomed into a separate thread within my sculpture practice. 


This work builds directly on visual and design elements developed during both the NHVB and NV2 projects. A bit larger than both of those pieces, it functions much better as a container without sacrificing what made its predecessors mechanically and visually compelling.


The mechanical action of this work is one that (for better or worse) gives the impression of a claw or a simple grabber. Which is why despite the familiar nomenclature in its formal title ("SMV3") it has already garnered a second semi-official nickname as “The Snatch Vessel”

Early concept sketch from 2016

The origins of this work shed a light on how my own abilities as a sculptor continue to grow. Of the handful of concept sketches I made for mechanical vessels, the early draft of this work was one in which I was least confidant.

While it was an interesting concept, it was one I felt I might not actually be able to build. I knew what the mechanics needed to do, but how to implement them in a way that was elegant and did not interfere visually with the rest of the object seemed quite impossible at the time. Like so many ideas, I set it aside to let it mature.


Experience and time have a way of bringing fresh solutions to old problems. Having now worked on quite a few kinetic art objects since 2016, I was now able to revisit this design and draw on a much larger pool of domain knowledge to finally realize this unique piece.


The mechanics for SMV3 may seem straightforward, but they are deceptively complicated.


On first impression, it looks as though depressing the plunger on the top would simply rotate the locking arms out to the side and allow the lid to be lifted off. But in order for the arms to properly release, they need to be able to swing down under the gripping edge of the container. Also, for the container to have a firm lock, the arms need to be able to swing back down under, and then lift up against that same gripping edge and keep tension, engaging like a hook. 

To do that, the pivot point of the five arms needs to be able to shift up and down at the appropriate time.


Three years ago, this was something I just couldn’t work out. My early attempts were too complex, required multiple steps to operate, and generally made it impossible to design an object that wasn’t a mechanical monstrosity.


But again, time and experience can sometimes bring clarity, and now the solution seems deceptively simple.


To achieve this, the lid was made in two parts, an upper and lower half. These halves can slide up and down independent of each other. The lower half of the lid serves three roles. It is what seats onto the lower vessel, sealing it shut. Its geometry also conceals the hinge pin openings on the upper half, preventing their removal. And lastly, it holds a spring that acts against the upper half of the lid, keeping it in tension. 


The top half of the lid houses the hinges for the plunger-actuated arms and floats on top of the spring in the lower half. When the plunger on the top is depressed to rotate the arms, it creates enough additional force to also compress the float spring. This allows the upper lid and hinges to drop just a fraction of an inch, allowing the hook-shaped ends of the arms to clear and swing free of the lower vessel so the lid can be removed.

This all works without any extra steps or motion on the part of the operator, and the same goes when replacing the lid while depressing the plunger. 


Interestingly, this arrangement also prevents operating the lid (and dropping the vessel) while being held in mid air by the knob alone. The mechanism only works when there is a counter pressure on the bottom of the container, be it a table, your hand, or another resting surface.

Family photo of NHVB, NV2, and the new SMV3

It all works too well really. It is one of those “it is so simple no one will believe it was hard to design” situations. But I don’t care, the piece works great and it looks even better. It fits beautifully into the family of vessels I have made to date and I count it among one of my most elegant technical achievements.


So as has become routine, I am eager to see what insights I can glean from developing and refining the process for making a small run of these works. So a limited edition seems in order.

Unlike the first two vessels, which were collaborations with my good friends over at RevolveMakers, I am going to bring this particular project back in-house and build them in my shop.

Because I will be building these alongside a couple of other projects I am developing, and because they are quite complex, this edition is going to be pretty limited. Probably around 10-15 works total.

Although I only have a prototype in brass and stainless steel at the moment, I will also offer a version in all Stainless steel. I am working on an example of that combination as we speak. But below is an approximation.

Its all silver...Get it :)

So how will this sign up work? 

I will open a pre-order sign up on Tuesday of next week (July 2nd at 12 Noon EST).

For the die-hard collectors out there, I will take the first 10 people who get their names on the list.

 From there I will make an additional 5 (or so) spots available to the rest of the people who add their names to the sign up, and assign them by doing a random number drawing once the list closes. 

I expect the first ten slots to disappear almost immediately so you will have to be very quick if you want to get a guaranteed spot. 

I will leave the sign up open all the way through Friday (July 5th). So anyone who feels lucky and wants to throw their name in the hat will have plenty of time to make an informed decision about whether to try and bring one of these beauties into their collection.

So look for a sign up link here (as well as IG and my newsletter) on Tuesday July 2nd, or sign up to my newsletter to have it emailed to you at the proper time. 

As always, comments and questions are welcome, and good luck.


6/4/19

MG.....3????


Everyone knows I love doing extra credit projects. Well, I wrapped on my MG-2 sculpture project much earlier than I expected, so I couldn't help experimenting with a thought that occurred to me during its production. 


Originally, I was using ceramic bearings for both the MG-1 and the MG-2. These bearings are very hard, which is what makes them such good bearings. However, this is not good for some applications and I found that they were not friendly to some of the softer metals I was using. This led me to think there was no way I could use aluminum in conjunction with this mechanical arrangement.

But during development of MG-2, I also started experimenting with Delrin bearings, which are a hard plastic. Turns out, they are just hard enough to work as a bearing, but much softer then ceramic, and to my surprise, much gentler on the races of my MG pieces.


At some point during fabrication of MG-2, I realized that this might open the door to doing a completely anodized aluminum version of the piece, as the Delrin is soft enough not to damage an anodized bearing race, which is something the ceramic bearings would surely do. This would allow a much wider range of colors and all but eliminate the other weight issue I had with the MG-2.

Unfortunately the ship had sailed on MG-2 to try it, but I just couldn’t resist and so here we are with a prototype for what I am calling MG-3.

Functionally it is very close to MG-2 but with a new profile and as you might imagine, the color variations are limited only by the number of dye tanks I have. I like doing things in three’s anyway, so I am going to make this an official release and call it the last of the MG series.


So I am going to open this up to a very small and limited edition. I am going to do a “FLASH SIGN UP!!” 

Sounds fancy right!
Basically, I want to limit the number of pieces I am going to make. Rather than a raffle or something like that, I want to try something new. I am going to severely limit the sign up window.  I will open a pre-order sign up similar to past sign ups, but the form will only be live for exactly ten minutes.  YEP…ONLY TEN MINUTES!

I will open the form at 12Noon EST this Thursday, June the 6th. I will close the form at 12:10 PM. No exceptions and only one work per person.

I am going to open up the color choice completely (something I never do) and allow you to choose any color combination you like, so long as it is a color that I already have set up. Here is the list.


  • Clear (No dye or raw aluminum look)
  • Bright Orange
  • Champaign copper
  • Deep copper (same dye as above just longer soak)
  • Green
  • Teal
  • Violet (Purple)
  • Blue (its like a royal blue)
  • Red (Merlot)
  • Black

Those are the colors I am working with currently, so you will be able to choose what ever you want for both the bodies and the inlays. I will work this out on the form.  Examples of each of these colors can be seen by looking through my catalogues of work on my website.
OK, that’s all for now. I will email the link to my mailing list at 12Noon on Thursday and post it to this blog and Instagram as well. I will close the form AFTER ONLY TEN MINUTES. This is only for the most dedicated collectors among you, so this should be fun.
Good luck. 

5/31/19

OTFB Series is complete


This post is an update on my OTFB Edition that I posted about earlier this year. 

This work is loosely based on a very common type of automatic knife called an "OTF" or "Out The Front" knife. Sort of like the much more popular switchblade, it is characterized by a spring loaded assembly that extends and retracts the blade through the top of the knife by means of actuating a small lever. 

In the case of this kinetic sculpture project, the center object moves both "Out the Front" and "Out the Back". Surely some crazy knife designer has made a knife like this somewhere at some time, but in any case, I am calling this work the "OTFB". The B stands for more than one thing, but I have given you the most obvious one.

The edition saw me experimenting with a wide variety of color and material combinations coupled with small tweaks to the original design. Below is the full catalogue of the entire run.


Red anodized aluminum with black powder coat. 


 Purple anodized aluminum with black powder coat


Green anodized aluminum with white powder coat


Blue anodized aluminum, re-machined to expose raw aluminum. 


Brass with red powder coating


Brass with Black powder coating.


Teal anodized aluminum with yellow powder coating


black anodized aluminum with green powder coating


Deep copper anodized aluminum with blue powder coating


Purple anodized aluminum with blue powder coating


And of course, no edition would be complete without at least one All stainless steel version. In this case, I made a pair of them. 


It was a long and fascinating ordeal to produce all of these variations, but all good things must come to a close. ...So that new good things can begin of course. 

Enjoy and see you next project.