As always, thank you for your time and attention. Comments and questions are welcome.
Web redirect
7/24/25
BVH 522232323434
As always, thank you for your time and attention. Comments and questions are welcome.
7/1/25
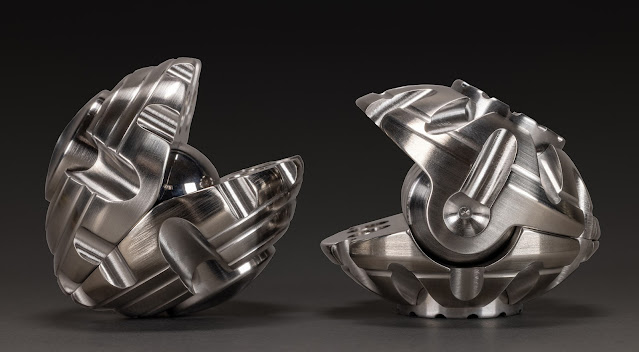
The Cves13 mechanical Vessel Sculpture
I am calling this one the “Cves13”. This name may not mean much to a viewer, but it means several things to me (some of them you can probably guess at). But no, I do not intend to share because being cagey with my titles has always been more fun. And as you will see, this post in particular asks far more questions than it answers.
On first impression, this piece most easily fits into my vessel series of works, as it is designed to be a (not so functional, but fascinating nonetheless) sort of bottle. But that is just a starting point, because there are some alternative lineages within my body of work that I can point to that make this piece all the more intriguing as a mashup of some of my favorite concepts. I will highlight just a few.

Lastly, this work is a piece which embodies my love for complex (if unnecessary) turning set ups. It uses dovetail joinery as an excuse to employ some really fun turning techniques on a lathe. Most practical machinist would prefer to use less risky tools or processes to avoid the kind of work I do to create this piece, but where is the adventure in that?
Producing the six legs of this vessel was an excuse to do what I described earlier as "extreme eccentric" turning. Some may see this as an unnecessary stunt, but to me it feels like a way to ensure I am constantly pushing the boundaries of what can be achieved on each of my tools.
Finally to wrap this up, I have one last (longish) tangent. I spent a lot of time 3D printing test models before attempting to machine this prototype. I don't often do this because I prefer to launch myself right into the fray. But in this case it felt necessary to make sure everything was fitting and playing nice.
Unlike my other editions, this work is quite complex, expensive, and time consuming to build. So while I am planning to make a small batch of these, I am going to limit the number of pieces to only ten works.
There are a number of decorative opportunities here I want to explore. I think the bottle lends itself to experimentation with decorative hardwoods provided I can find (or make) some interesting specimens. Because of this, I am going to give myself a little more time than usual to make these. I will probably take the rest of the year to slowly and carefully execute each of these ten works.
If this is something you might be interested in collecting or collaborating on, I will be sending out a second email/post in two days (Thursday July 3rd 11AM EST) with a simple sign up to register your interest. Given the limited numbers, I suspect there to be a good chance interest may exceed supply, so let's just say that the first five spots on the list will be allocated on a first come first serve basis. The remaining spots will be sorted out with some sort of lottery.
I will include a lot more details at that time (including pricing). However, if you do have a burning question, you can drop me an email in the meantime.
1/6/25
K Ray
Happy new year everyone, I decided to take some much needed time off to close out last year, but now I am back in the studio and putting the finishing touches on my latest project.
This work is the next progression in my "Ray-shaped" series. It builds on what were mostly superficial knife design references from my RR212 piece, and brings them into a more functionally familiar space.
When I say that, I simply mean that I am a sculptor taking a sculptural approach to a genre I admire, but do not pretend to fully understand. That sort of thing can take a lifetime, so I feel obligated to say that I am just a visitor, not a resident, of knife-land.
With that said, I find myself circling knife design often, and so have endeavored to dip my toe in once again with the goal of saying something new about a craft with a very long tradition.
More on the engineering front: I took a number of extra steps to lighten the weight of this piece to balance how well the tail can support the weight of the work. For starters, the “wing” sections are made in aluminum, which is very lightweight. I did some extra hollowing out on the hidden side to lighten them even further.
I specifically wanted them to be aluminum as well because this piece was screaming for some bold colors. That dark blue is actually a deep deep grey dye that takes on a battleship blue or denim color when left to fully saturate.


